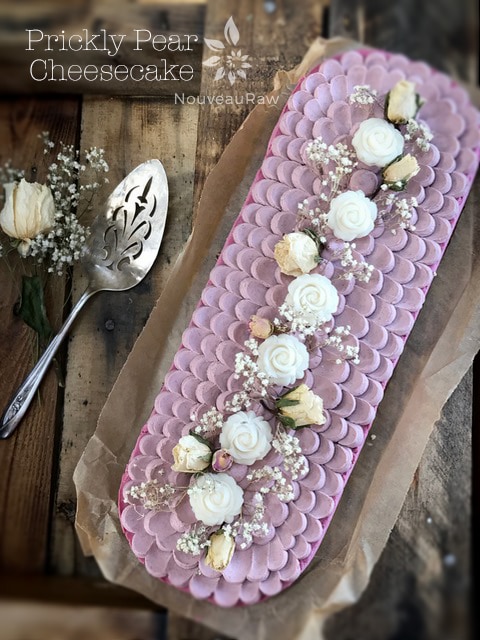
Prickly Pear Cheesecake

 Add to favorites

~ raw, vegan, gluten-free ~
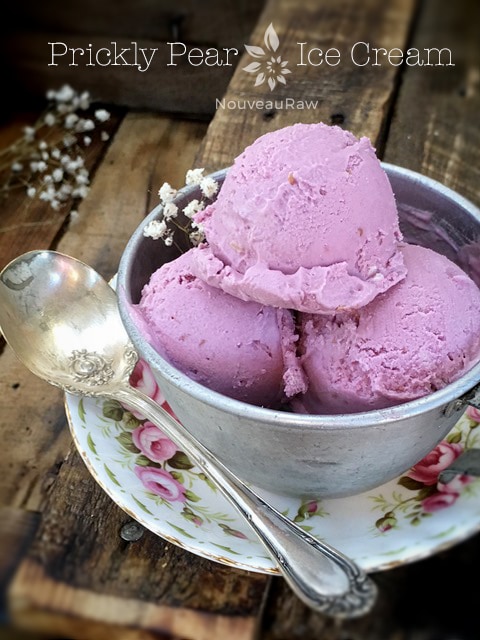
Prickly Pear Cheesecake. Never in a million years would I have ever thought that I would be making a raw cheesecake with a cactus as the star ingredient!
How can a plant that is so vicious to the touch offer such a delicate sweet flavor? The vibrant magenta color is very captivating and downright unbelievable.
The frosting that I made for this cheesecake can be found here. It offers a wonderful balance to the lightly sweet flavor of the prickly pear. I did tint the frosting with some prickly pear juice.
If you have the ability to get your hands on some prickly pears, (well, please don’t literally put your hands on them) I so encourage you to give this recipe a try.
The shape of this cheesecake may not seem traditional, but I felt the need to spruce things up so I used my rectangle Springform pan. I did have some leftover so I made an additional 4″ round cheesecake too. But if you want to make just one, you can use a 9″ pan.
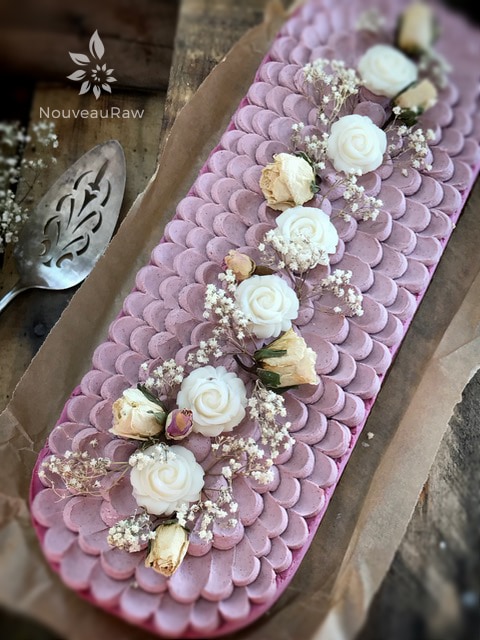
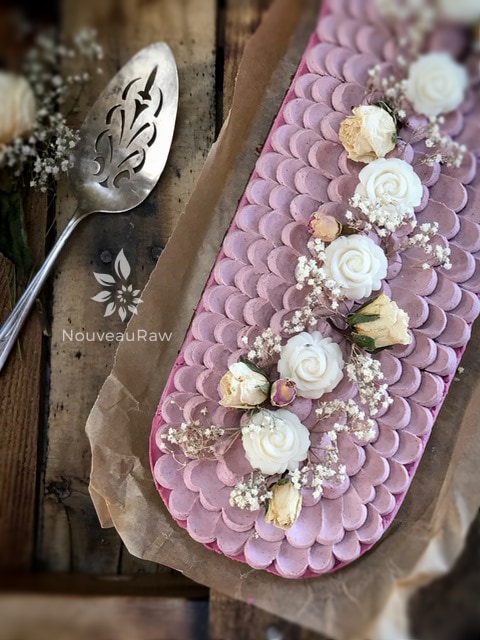
How you choose to decorate your dessert is totally up to you. Keep it plain and simple or dress it up for a night on the town. :) I mentioned above that I put frosting on top of mine. I did a piping technique that I have used before on my Red Velvet Cake. Please refer to it for step by step directions. It’s very simple and easy to do… and it makes for a stunning presentation.
On top of the frosting, I created coconut butter roses with (this) mold. I simply softened the coconut butter, poured it into the mold, and slid it into the freezer to quickly harden. So easy and so pretty. I then added some edible roses and garnished it with dried babies breath. This cheesecake can be served frozen or thawed (and anywhere in between). We prefer it thawed about halfway. I hope you enjoy this recipe and have the opportunity to try prickly pears out. If you, do please comment below. :)
 Ingredients:
Yields 9″ cheesecake
Crust:
Filling:
- 3 cups cashews, soaked 2+ hours
- 1 1/2 cups almond milk
- 3/4 cup maple syrup
- 1 cup fresh prickly pear juice (see below)
- 2 Tbsp fresh lemon juice
- 1 Tbsp liquid vanilla
- 1/4 tsp Himalayan pink salt
- 2 Tbsp sunflower lecithin powder
- 3/4 cup coconut oil, melted
Preparation:
Crust:
- Assemble a Springform pan with the bottom facing up, the opposite way from how it comes assembled.
- This will help you when removing the cheesecake from the pan, not having to fight with the lip.
- Wrap the base with plastic wrap. This will make it easier to remove the pie when done… unless you plan on serving the cake on the bottom of the pan.
- In the food processor, fitted with the “S” blade, pulse the almonds into small pieces, then add the coconut, cacao, and salt
- Be careful that you don’t over-process the nuts and head towards making a nut butter. Nothing wrong with that… just not our goal at the moment.
- This ensures that the dry ingredients (spices) get well distributed so you don’t end up with concentrated pockets of flavors.
- Add the sweetener and vanilla, pulsing it together. Test the batter by pinching it between your fingers. If it holds, it is ready.
- Distribute the crust evenly on the bottom of the pan, using even and gentle pressure. If you press too hard it might really stick bad to the base of the pan, making it hard to remove slices. You can either just make the crust on the bottom of the pan or you can also bring it up the sides. If you go up the sides, double the recipe.
- Set aside while you make the cheesecake batter.
Make prickly pear juice:
- Remove needles from the pear but burning them off with a small hand torch. This is very important! The small needles on the fruit are very painful if they get under your skin. So handle carefully.
- After the needles are burnt off, cut the fruit in half and scoop out the seeds and flesh, placing them in the blender.
- Blend the flesh and seeds in the blender for about 40 seconds. Pour the mixture into a nut bag or a mesh screen to separate the seeds and pulp from the juice. Discard seeds and pulp.
- Drain the soaked cashews and discard the soak water. Place in a high-speed blender.
- In a high-powered blender combine the; cashews, almond milk, sweetener, prickly pear juice, vanilla, and salt.
- Due to the volume and the creamy texture that we are going after, it is important to use a high-powered blender. It could be too taxing on a lower-end model.
- Blend until the filling is creamy smooth. You shouldn’t detect any grit. If you do, keep blending.
- This process can take 2-4 minutes, depending on the strength of the blender. Keep your hand cupped around the base of the blender carafe to feel for warmth. If the batter is getting too warm. Stop the machine and let it cool. Then proceed once cooled.
- With a vortex going in the blender, drizzle in the coconut oil, and then add the lecithin. Blend just long enough to incorporate everything together. Don’t over-process. The batter will start to thicken.
- What is a vortex? Look into the container from the top and slowly increase the speed from low to high, the batter will form a small vortex (or hole) in the center. High-powered machines have containers that are designed to create a controlled vortex, systematically folding ingredients back to the blades for smoother blends and faster processing… instead of just spinning ingredients around, hoping they find their way to the blades.
- If your machine isn’t powerful enough or built to do this, you may need to stop the unit often to scrape the sides down.
- Pour the batter into the pan.
- Gently tap the pan on the counter to remove any air bubbles.
- Chill in the freezer for 4-6 hours and then in the fridge for 12 hours.
- Store the cheesecake in the fridge for 3-5 days or up to 3 months in the freezer. Be sure that they are well sealed to avoid fridge odors.
© AmieSue.com
Tags: Dairy Free, Gluten Free, Refined Sugar Free, Soy Free, Vegan


That looks like fun! And so delicious.
Yum! You’ve come up with yet another delicious creation, Amie Sue! This one is almost my new favorite, but that chocolate mousse with lemon frosting wins by a hair. ;)
This was rich and well-textured without being too sweet. Thanks Aime Sue!
i got started with catus when my boyfriend told me that you could eat them and now i have been tring to get good recipes for cactus. we have a prickly pear cactus field across the street from us so i dont have to go very far to go to get them
Oooh to have an abundance of such ingredients! I am new to testing out eating cati but not against it. :) Who knew something so beautiful would be surrounded in such a harsh exterior?!
I just tried to make this cake for Thanksgiving. Is the batter supposed to be completely runny when you put it in the springfoam pan? Will it harden in the freezer?
Sandra,
It should pour like a thick cream. Did you use the same ingredients as indicated? Did you soak and drain the nuts? amie sue
Ah I guess that’s where I went wrong. I omitted them due to a nut allergy. Any alternative suggestions??
Thanks!
Hi Sandra… so you didn’t add the cashews or anything in its place? If thats the case, I see why the recipe failed. Do you eat a 100% raw or what does your diet look like (asking so I can suggest substitutions). Can you eat seeds? Keep me posted.
What was used for the base in the spring form pan? This cheese cake looks amazing and I can’t wait to give it a go.
I just used a basic crust recipe that I typically use with my cheesecake recipes. I can’t recall the exact one from that particular cake. If you need crust ideas just look at some of the cheesecake recipes and pick one that sounds good to you. Have a great day, amie sue