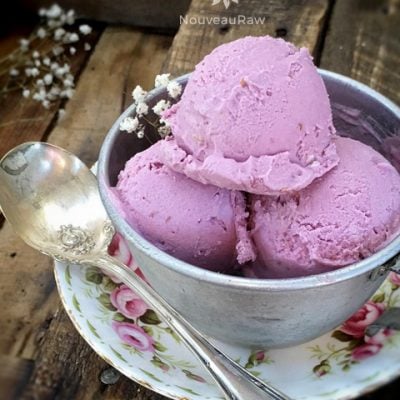
Prickly Pear Ice Cream

 Add to favorites
~ raw, vegan, gluten-free ~ 
Difficult to imagine what prickly pear ice cream might taste like? I guess I had no clue either… well, that was until I got my hands on some while living in Tucson, Arizona. Before then, I had no clue such a fruit existed. They have an unexpected surprise taste of a combination of bubble gum and watermelon. That’s how my taste buds identified the flavor.
While visiting a local Farmer’s Market, we stumbled upon a vendor that was selling Prickly Pear Popsicles as well as the fruit itself. So we decided to buy some. We actually had no idea on what to do with or how to prepare them, but we always have Google! :) Bob really got excited reading about the preparation because it involved a torch! I share below how this comes into play.
This fruit is also called Cactus Pear, Tuna fruit, Indian figs, and Mission cactus. Good-quality prickly pear is egg-shaped and has yellow to magenta coloring depending on the variety. They will ripen at room temperature.
Prickly pears grow on a cactus. The small seeds are edible, but the rind is not. Be careful of spines that were not removed. Trust me; it’s a hum-dinger if one finds its way into your finger.
Prickly pears are low in Saturated Fat and very low in Cholesterol and Sodium. They’re also an excellent source of Calcium and Potassium, and a very good source of Dietary Fiber, Vitamin C, and Magnesium.
Since moving from Arizona, I have yet to find any prickly pears in the stores… but perhaps you live in the perfect climate where they grow, and you have had a burning desire to make something with them… well, now you can. :) I do hope you enjoy this recipe. Please comment below. Blessings, amie sue
Ingredients:
yields 5 cups batter
- 2 cups of raw soaked cashews 2+ hours
- 1 1/4 cup of prickly pear juice
- 1 cup of young Thai coconut meat
- 1/2 cup young Thai coconut water
- 1/3 cup + 1/4 cup maple syrup
- 1 Tbsp fresh lemon juice
- 1/4 tsp Himalayan pink salt
Preparation:
- Prickly pear juice:
- While holding the fruit with tongs or with a knife stuck into the end, remove needles from the pear by burning them off with a small hand torch. This is paramount!
- The small needles on the fruit are very painful if they get under your skin. So handle carefully.
- After the needles are burnt off, cut the fruit in half and scoop out the seeds and flesh, then put them in the blender.
- Blend the flesh and seeds in the blender for about 40 seconds. Pour the mixture into a nut bag or a mesh screen to separate the seeds and pulp from the juice. Discard the seeds.
- Place the cashews in a glass bowl, along with 4 cups of water.
- Soak for at least 2 hours. Read more about why (here).
- The soaking process will help reduce phytic acid, which will aid in digestion.
- The soaking also softens the cashews, so they blend nice and creamy.
- After the cashews are through soaking, drain, and rinse.
- In a high-speed blender, combine the cashews, prickly pear juice, coconut meat, and water, sweetener, lemon juice, and salt. Blend until nice and creamy.
- Due to the volume and the creamy texture that we are going after, it is important to use a high-powered blender. It could be too taxing on a lower-end model.
- Blend until the filling is creamy smooth. You shouldn’t detect any grit. If you do, keep blending.
- This process can take 2-4 minutes, depending on the strength of the blender. Keep your hand cupped around the base of the blender carafe to feel for warmth. If the batter is getting too warm. Stop the machine and let it cool. Then proceed once cooled.
- Place the blender carafe in the fridge or freezer for 1 hour.
- If chilled in the fridge it can stay there for up to 8 hours. But don’t leave it in the freezer for more than an hour or it will freeze solid.
- Once chilled pour the batter into the ice cream maker and follow the manufacturer’s instructions.
- It is best to take the ice cream out of the freezer about 10 minutes ahead of time, so it can have a chance to soften.
- Eat within 1 month.
Freezing Suggestions for Ice Cream:
-
Use an ice cream machine. Follow the manufactures directions.
-
Freeze in popsicle molds or 3 oz Dixie cups with a popsicle stick inserted.
-
-
Store the ice cream in the very back of the freezer, as far away from the door as possible. Every time you open your freezer door you let in warm air. Keeping ice cream way in the back and storing it beneath other frozen-sold items will help protect it from those steamy incursions.
-
Ice cream is full of fat, and even when frozen, fat has a way of soaking up flavors from the air around it—including those in your freezer. To keep your ice cream from taking on the odors, use a container with a tight-fitting lid. For extra security, place a layer of plastic wrap between your ice cream and the lid.
-
To soften in the refrigerator, transfer ice cream from the freezer to the refrigerator 20-30 minutes before using. Or let it stand at room temperature for 10-15 minutes.
-
Wish to make your own raw ice cream, wonder what machine I might recommend, and more? Click (
here) to check out the Reference Library!
© AmieSue.com
Tags: Dairy Free, Gluten Free, Refined Sugar Free, Soy Free, Vegan


This looks beautiful. I will definitely have to try this – with the green variety, too. There is a simpler way to peel and enjoy prickly pears that doesn’t involve a torch. Using a fork to hold the fruit steady, cut off both ends. Then make a cut in the peel lengthwise. Then, use your fork and knife to peel it. The peel should come off very easily if the fruit is ripe. Hope that makes sense. If I had some prickly pears, I’d take some pictures to illustrate.
Yes Kim, that makes total sense. My husband just jumped up and got excited when he found out that he could use the hand blow torch in the kitchen. haha
I was lucky to be at the Farmer’s Market on this day. It will now be unforgettable in more than one way. :)
Amie Sue blessed me with a taste of this treat! The color is glorious. Not only did it look great it tasted fabulous! But, even better was the healing effect of the prickly pear on my body.
Now you can add “Healer” to your title. Oh, and don’t forget “Hand Model”. Lol
has anyone tried burning off the spines/glochids while the fruit is still attached to the cactus?
That’s a great question Marilyn, but I don’t know the answer. I didn’t pick mine, I bought mine. I haven’t lived in Arizona for over 10 years now and when I did live there, I didn’t do a lot with this fruit, except for this ice cream recipe. I would recommend either doing some Google research or ask some locals who are familiar with this cactus. Blessings, amie sue
[…] Sweet Life – Prickly Pear Lemonade, Popsicles, Granita & Sorbet by How Does She – Prickly Pear Ice Cream by Nouveau Raw – Agua de Tuna – Fresh Prickly Pear Water by girlichef – Prickly […]
[…] Sweet Life – Prickly Pear Lemonade, Popsicles, Granita & Sorbet by How Does She – Prickly Pear Ice Cream by Nouveau Raw – Agua de Tuna – Fresh Prickly Pear Water by […]
can you burn off the glochids/spines prior to removing the fruit from the plant?