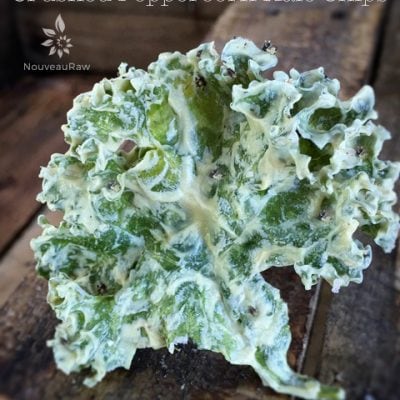
Crushed Peppercorn Kale Chips

 Add to favorites

I have been developing raw whole-food recipes for a long time now, and I love the fact that I am still discovering wonderful new recipes, techniques, and ingredients every day. Best of all, I love teaching and sharing them with you.
I read that “Your life as a teacher begins the day you realize that you are always a learner.” (Robert John Meehan) Isn’t that the truth?
When time permits, I love to culture all the nut and seed-based sauces, dips, and spreads that I create. Not only does it give a unique twist of flavor, but it also increases the nutritional value. This got me to thinking the other day when I was creating some kale chips. Why don’t I culture the sauces for them? I love those aha moments!
That is exactly what I did for this recipe, and let me tell you what… these turned out to be my all-time favorite kale chips. Yep, I have said that before. But isn’t it awesome that our tastes can develop and become even more elevated with each and every recipe?
For this recipe, I tried my Mega sporebiotic probiotics. My girlfriend turned me on to these, and they are very powerful. I have made other cultured recipes with it and learned the hard interesting way that a little bit goes a long way. I needed to use only one capsule for this recipe, where with other brands I use 1 teaspoon. You don’t have to use the brand that I did–use what is available to you, I just wanted to share that experience with you.
A snippet on Mega sporebiotic
“MegaSporeBiotic is the only product with 5 pharmaceutical grade bacillus spore strains. In addition, MegaSporeBiotic is the first probiotic to introduce a strain that produces key nutrients in the digestive system. In this case, the nutrients produced are powerful carotenoid antioxidants. Carotenoids are the beneficial antioxidants found in colored fruits and vegetables. Carotenoids from dietary supplements, however, are poorly absorbed and most people do not eat as many colored fruits and vegetables as they should, thus supplementation with a carotenoid-rich probiotic is highly important. These beneficial bacteria produce high levels of carotenoids right at the site of absorption, thus allowing for optimum uptake into the body. MegaSporeBiotic is the first and only probiotic with such a feature.” (source)
Below, I offer two different ways to make the kale chips. One is in the dehydrator, and the second way uses the oven. I always include this in my kale chip recipes for those who don’t own dehydrators. BUT, I must warn you… if you use the oven, you will kill the probiotics and lose their benefits. So, if you must use the oven, I suggest you skip the culturing part. I hope you enjoy this recipe, and please comment below. Many blessings, amie sue
Ingredients:
Yields about 2 cups sauce
Cheese:
- 2 cups raw cashews, soaked 2+ hours
- 3/4 cup water
- 1 tsp Probiotics powder or 1 Mega sporebiotic capsule
Add-ins:
- 2 1/2 Tbsp nutritional yeast
- 1 Tbsp onion powder
- 1/4 tsp fresh powdered nutmeg
- 1 1/2 tsp Himalayan pink salt
- 1/4 tsp white pepper
Topping:
- Fresh cracked black peppercorns
- Coarse sea salt
Preparation:
Culturing the base:
- First and foremost, make sure all of the utensils and pieces of equipment you use for culturing are sterilized to avoid growing bad bacteria.
- If at any time mold forms–fuzzy, black, or pink–it will need to be tossed.
- After soaking the cashews, drain and discard the soak water.
- In a high-speed blender, blend the soaked cashews with probiotics and warm water until smooth.
- Depending on the blender, this can take up to 4 minutes.
- Place into a glass bowl and cover with a towel. Allow it to rest at room temperature for 14-16 hours to culture.
- If you don’t want a strong fermenting flavor, stop it around 8 hours and give it a taste test. If it doesn’t taste strong enough, let it ferment longer.
- Do not use a metal or plastic bowl.
- The climate that you live in can and will affect the speed at which your culture takes place. So, sample along the way.
- After it is through culturing, hand mix in the nutritional yeast, onion powder, nutmeg, sea salt, and white pepper.
- Selecting kale:
- Don’t use wilted/old kale, it can have a bitter undertaste.
- I prefer curly kale because all of the folds really hold on to the sauce.
- Wash and de-stem your kale.
- Start by washing the kale and blotting it dry. You can also use a salad spinner if you own one.
- Make sure you get as much excess water off the kale as possible. If you don’t, it will make your sauce “soupy.” Set aside.
- Starting at the bottom, strip away the leaf, leaving behind only the stem.
- Tear the remaining leaves into pieces that are a tad larger than bite-size, since they tend to shrink.
Assembly:
- Place the torn kale in a very large bowl.
- Pour in the sauce, and with your hands, gently and evenly coat each piece of kale.
- This is a “hands-on” job. Stirring with a spoon just doesn’t do the trick.
- I would suggest removing any jewelry from your hands. I have temporarily lost a ring here and there.
Dehydrator Method:
- Have the dehydrator trays ready by lining them with non-stick teflex or parchment paper.
- Don’t use wax paper, because food tends to stick to it.
- Spread all the trays out in advance, because soon your hands will be covered in sauce and you don’t want to get it all over.
- Place the kale on the non-stick sheets. You can do this 1 of 2 ways:
- Lay each piece out semi-flat if you want to create individual pieces. This is more time-consuming, and the chips tend to a be a little bit more fragile.
- Or, drop clumps of coated kale on the sheets. This will create hardy clusters that are loaded with sauce and flavor. This is my preference.
- Top with fresh cracked black pepper and salt.
- Dehydrate at 115 degrees (F) for about 6-8 hrs or until dry.
- I tend to pull mine out before it gets 100% dry because I like the chips a little chewy.
- The dry time is just an estimate. The climate, humidity, dehydrator, and how full the machine is can all affect how long it will take to dry.
- Store in an airtight glass container and be ready to nibble non-stop till the last crumb is gone!
- If the kale chips start taking on some humidity from the house, you can place them back into the dehydrator for a few hours at 115 degrees (F).
Oven Method:
** This method will kill the probiotics.
- Please use this as a guide and closely monitor the kale chips as they cook.
- Preheat the oven to 300 degrees (F)–anything higher, and you risk burning the chips.
- Line the baking sheet with parchment paper and place the kale chips on the baking sheet in a single layer.
- Bake for 10 minutes, rotate the pan, and bake for another 15 minutes.
- The bake times will vary based on your oven, but it’s a good starting point!
- Once you pull the tray from the oven, allow the chips to cool on the baking sheet.
- Store in an airtight glass container and be ready to nibble non-stop till the last crumb is gone!
© AmieSue.com
Tags: Alkaline, Cultured, Dairy Free, Dehydrated, Gluten Free, Refined Sugar Free, Soy Free, sugar free, Vegan

This is fantastic–I’d love to try it… But where can I get Mega Sporebiotic in the US? It looks like a UK based company that only sells to physicians.
Hello Sarah, yes, this brand is sold in doctor offices. You can contact the company to see if anyone local in your area is carrying it… or you can use other brands of probiotic. Many blessings, amie sue