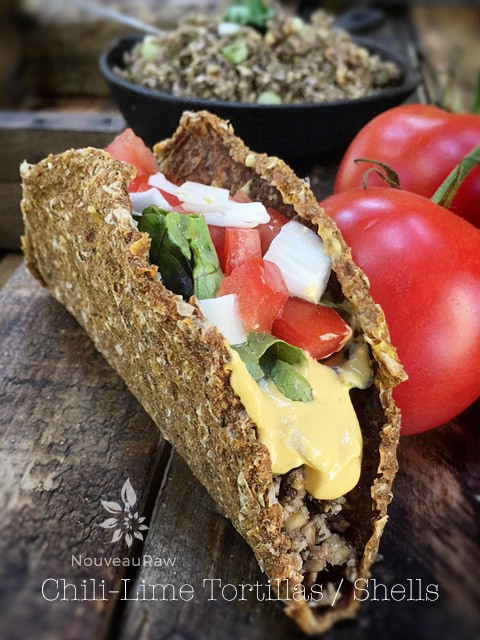
Crunchy Taco Shells

 Add to favorites
– raw, vegan, nut, gluten-free –
 What is a taco without a taco shell? A taco salad… is there anything wrong with a taco salad? Nope, not a thing but why not spruce it up with some taco shells?!
These taco shells have an excellent corn, Mexican-fare flavor, and texture, and offers the fiber, iron, and complex carbohydrates your body needs. Complex carbs are slower-burning, steadier source of energy and should be your main source of carbs.
I try to keep my carb counts on the lower end of the spectrum so when I do eat them; I try to choose wisely. Listen to your body and find the right balance for you.
When selecting corn, you can use fresh or frozen for this recipe. But most importantly… use only organic corn that is NON-GMO. I used frozen for this batch since corn wasn’t in season.
There is a timing factor when it comes to creating taco shells. They do require a little babysitting as they near their finished dry time. If not monitored they can go from soft and formable shells to tostada style shells. Of course, there isn’t anything wrong with that, if that is what you are aiming for. But to get the shell shape, you will need to catch them when they are just dry enough, pliable enough, to fold into shell shapes. Once you have them shaped, you will continue to dry them until crunchy.
TECHNIQUE
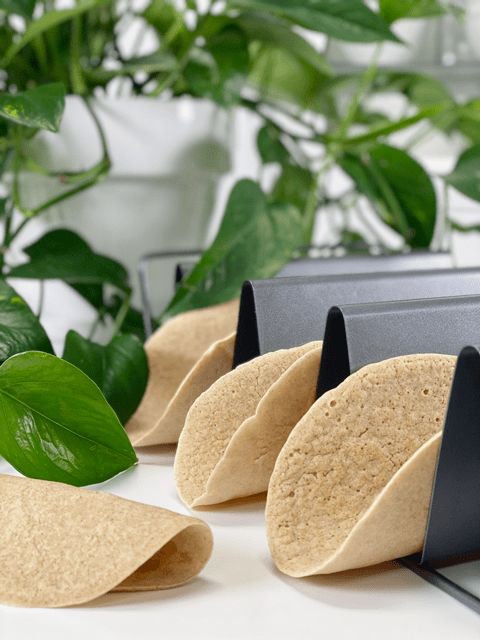
I used my baked taco shell holder (not exact but close) to shape the shells. You will need a dehydrator that has a box cavity such as the Excalibur, Sedona, or equivalent. I placed plastic wrap over each hump on the holder and gently laid the pliable shell over it while helping it ever so carefully into the shell shape. I provided photos below demonstrating this process. You will become the Taco Shell Whisperer. Hehe, I can fit two of these units in my 9 – tray Excalibur. If you don’t own a dehydrator, you could bake them in your oven, but they most likely won’t remain raw. You will still be ahead of the ballgame through, regarding nutrients and quality control of ingredients.
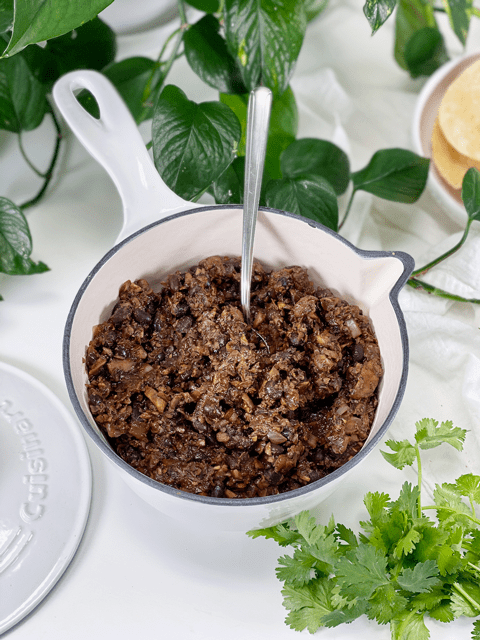
When storing, I took some card stock paper and created support for the shell, just to protect their shape. See photo above. I hope you enjoy these taco shells and remember to think outside of the Mexican ingredients that typically get packed into taco shells. You can load them up with a variety of ingredients, thus breathing new life and new menu options. Many blessings, amie sue
Ingredients:
yields 9 (1/3 cup) shells
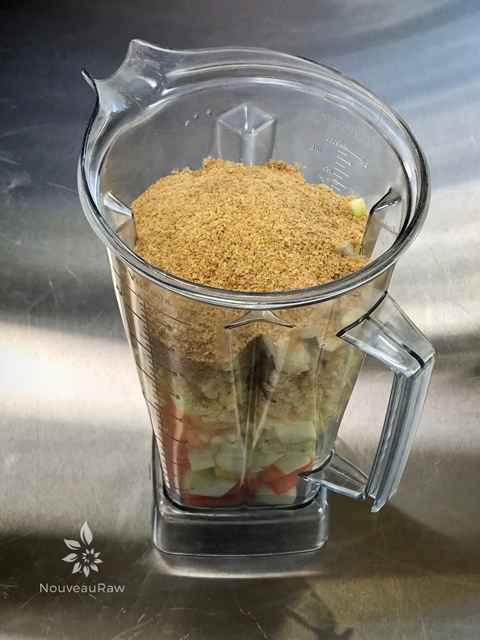
- 2 cups (273 g) organic corn kernels
- 2 1/4 cups (328 g) chopped zucchini, peeled
- 2 1/2 cups (300 g) yellow bell pepper
- 2/3 cup (90 g) diced white onion
- 1 Tbsp (13 g) lemon juice
- 1/2 tsp (3 g) Himalayan pink salt
- 1/4 tsp (1 g) cumin powder
- 2 tsp (6 g) chili powder
- 1 garlic clove
- 1 cup (120 g) ground flax seeds
Preparation:
- In a food processor, fitted with the “S” blade, combine the corn, zucchini, bell pepper, onion, lemon juice, salt, cumin, chili powder and ground flax seed. Process until the batter is smooth.
- This amount of ingredients create a large volume of 5 1/4 cups of batter, so you need a big blender, or you might need to blend it in stages.
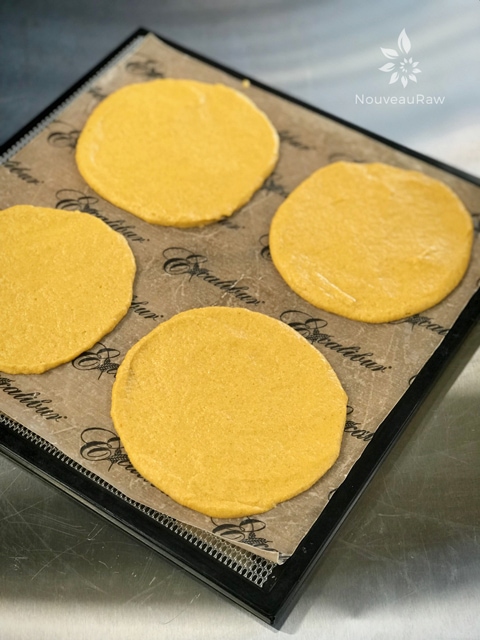
- Line the dehydrator tray with a non-stick sheet.
- Using a 1/3 cup measuring cup, place the batter on the tray positioning 1 in each corner.
- Spread the batter into a 6″ circle with an offset spatula.
- Dehydrate at 145 degrees (F) for 1 hour, reduce to 115 degrees (F) and continue to dehydrate for about 2-6 hours or are dry enough to transfer to the taco shell holders.
- I found it helpful to line the taco shell mounds with plastic wrap before I folded the shell over it, this made for a slick removal once dry.
- Gently lay the taco shell over the molds, making sure to avoid cracks. If cracks form, the shell has become too dry. You can then either let them continue to dry flat for tostada shells, or you can wet them with water to help soften them back up.
- Continue to dehydrate for another 6 hours or until dry.
- I used this mold: baked taco shell holder (couldn’t find the exact one like mine).
- Store once cooled, in an airtight container on the counter. Mine kept for almost two weeks.
- If they are exposed to a lot of humidity, they will start to soften.
- You can crisp them back up by placing them in the dehydrator.
- They can last up to several weeks if well sealed and protected.
The Institute of Culinary Ingredients:
- What is Himalayan pink salt and does it matter? Click (here) to read more about it.
- Learn how to grind your own flaxseeds for ultimate freshness and nutrition. Click (here).
- Be selective when purchasing corn. Aim for organic (non-GMO). Click (here) to learn more.
Culinary Explanations:
- Why do I start the dehydrator at 145 degrees (F)? Click (here) to learn the reason behind this.
- When working with fresh ingredients, it is important to taste test as you build a recipe. Learn why (here).
- Don’t own a dehydrator? Learn how to use your oven (here). I do however truly believe that it is a worthwhile investment. Click (here) to learn what I use.
© AmieSue.com
Tags: Dairy Free, Dehydrated, Gluten Free, Mexican, Nut Free, Refined Sugar Free, Soy Free, sugar free, Vegan


What a yummy looking recipe, Amie Sue. You can surely come up with some great ones. You are such an inspiration to me, as well as to hundreds more. Thank you for sharing so freely with us.
The pics are beautiful also and help to see how to create the recipe better. Good job!!
Oh, thank you, Nancy. :) Mexican is one of my favorite foods… so I have so much fun coming up with recipes to satisfy those cravings. hehe I hope you have a blessed and happy day. hugs, amie sue
Hi Amie Sue,
I thought I saw a raw vegan corn taco shell recipe or it may have been a raw vegan corn tortilla recipe, on your website in which an avocado is one of the ingredients used? I can’t find it.
Good day Azna,
I don’t have a taco shell recipe using avocado in it. I looked through the ones on the site as well as ones that I may have in draft form. No such luck. Sorry. amie sue
Thank you for looking. Much appreciated and much obliged.